In the world of e-commerce, a shopping cart is a fundamental component of any online store. It allows customers to add products to their cart, review their selections, and proceed to checkout for purchase. If you’re building an e-commerce website using PHP and MySQL, this guide will provide you with a step-by-step tutorial on how to create a simple shopping cart system from scratch.
Prerequisites:
Before diving into building the shopping cart, make sure you have a basic understanding of PHP, MySQL, and web development concepts like HTML, CSS, and JavaScript. You’ll also need a development environment set up, such as a local web server (e.g., XAMPP, WAMP, or LAMP) for testing the PHP code and a MySQL database to store the product and cart data.
Step 1: Database Setup The first step in building a shopping cart is to create a MySQL database to store product information and cart data. You can use a tool like phpMyAdmin or MySQL command-line interface to create a new database with a name of your choice, and define the necessary tables.
For example, you can create two tables: “products” and “cart”. The “products” table can have columns like “product_id”, “product_name”, “product_price”, and “product_image” to store information about the products available for purchase. The “cart” table can have columns like “cart_id”, “product_id”, “quantity”, “user_id”, and “status” to store the products added to the cart by users.
Step 2: Creating HTML Views Next, you can create the HTML views for displaying the products and the shopping cart. You can create separate files for the product listing page, product details page, and the shopping cart page. These views will be responsible for rendering the HTML markup and displaying the data to the users.
For example, the product listing page can display the products fetched from the “products” table in a grid or list view, with each product displaying its name, image, price, and an “Add to Cart” button. The product details page can display the detailed information of a selected product, and the shopping cart page can display the products added to the cart along with their quantities and the total price.
Step 3: Implementing PHP Functionality After creating the HTML views, you can implement the PHP functionality for handling the logic of adding products to the cart, updating the cart, and processing the checkout. You can create PHP scripts to handle the user interactions with the views, interact with the MySQL database to fetch product information, and manipulate the cart data.
For example, when a user clicks the “Add to Cart” button on the product listing page, the PHP script can receive the product ID and quantity as input, validate and sanitize the data, and then insert the product details into the “cart” table with the user ID (if logged in) or a temporary session ID (if not logged in). The PHP script can also handle updating the cart when a user changes the quantity of a product in the cart or removes a product from the cart.
Step 4: Implementing Checkout and Order Processing Once the cart functionality is in place, you can implement the checkout process. This typically involves validating and processing the cart data, collecting the user’s shipping and payment information, and generating an order confirmation.
Let’s us code. It is very easy and simple. You can easily download and customize as per your need.
This software is well-designed with the help of CSS, and Bootstrap.
We will include following features
- Retrieve products information (product name, product price and image) from the database.
- Create product gallery in front-end with the help of bootstrap.
- Addition, deletion of cart items using the PHP Session.
- Number of products in cart.
File Structure
Following files will be used for this project.
- db.php – It contains the code for database connectivity.
- index.php – to display the products for the shopping cart.
- cart.php – contains code for add to cart and remove a product from cart.
- product-images – contains the image of products
- bootstrap/bootstrap.min.css – bootstrap Css template.
- bootstrap/bootstrap.min.js – bootstrap Js file
- js/jquery.js – Jquery file
Let’s go through the each block of code step by step to understand it better.
Step 1: Create products gallery
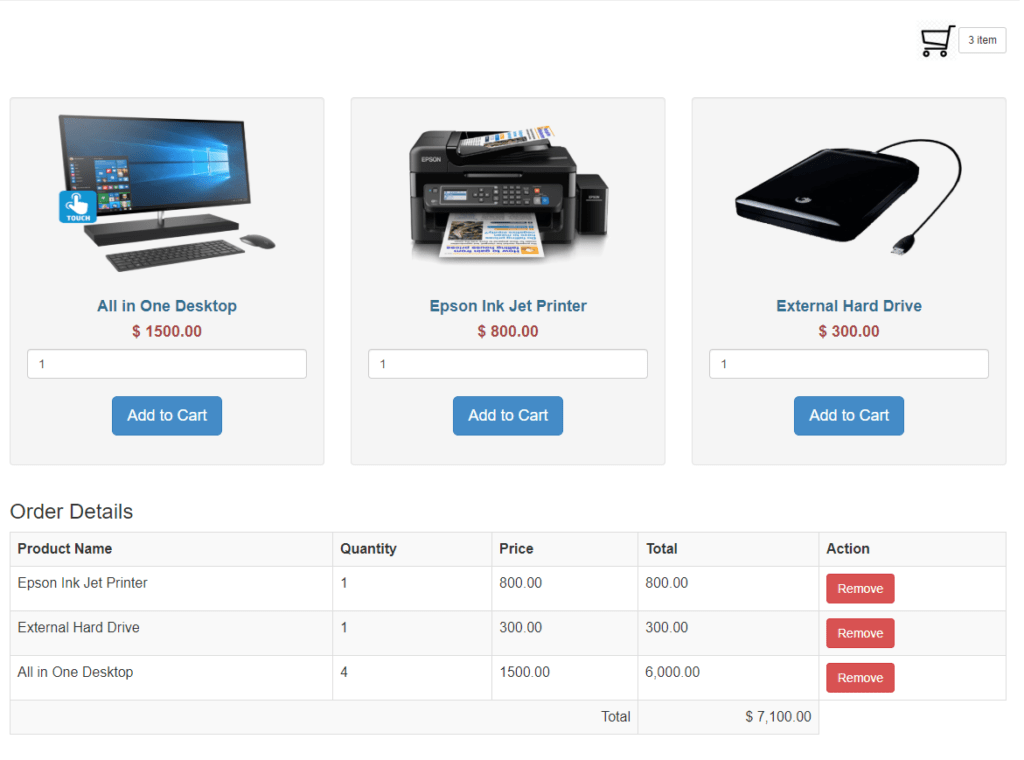
In order to create a product gallery, I have used the PHP script to get the products information from the database. In product gallery, I’ve shown products information like product name, product image, product price.
<?php
$query = "SELECT * FROM tblproduct ORDER BY id ASC";
$result = mysqli_query($conn, $query);
if (mysqli_num_rows($result) > 0) {
    while ($row = mysqli_fetch_array($result)) {
        ?>
        <div class="col-md-4">
            <div class="well text-center center-block" style="min-height:350px;">
                <form method="post" action="index.php?action=add&id=<?php echo $row['id']; ?>">
                    <center><img src="<?php echo $row['image']; ?>" class="img-responsive" style="width:300px;height:180px;"></center><br>
                    <h4 class="text-info"> <strong><?php echo $row['name']; ?> </strong></h4>
                    <h4 class="text-danger"> <strong>$ <?php echo $row['price']; ?></strong></h4>
                    <input type="number" name="quantity" class="form-control" value="1"/>
                    <input type="hidden" name="hidden_name" value="<?php echo $row['name']; ?>"/>
                    <input type="hidden" name="hidden_price" value="<?php echo $row['price']; ?>"/><br>
                    <input type="submit" name="add_to_cart" class="btn btn-lg  btn-primary" value="Add to Cart" />
                </form>
            </div>
        </div>
        <?php
    }
}
?>
Step 2: Adding a product to cart
Once the product gallery is created. I’ve written code for adding a product to shopping cart. Shopping cart is a block where user can get information about the product he/she choose. Also it will show the product quantity and price for the added item in the cart.
<div class="col-md-12">
    <h3>Order Details</h3>
    <div class="table-responsive">
        <table class="table table-bordered table-striped">
            <tr>
                <th>Product Name</th>
                <th>Quantity</th>
                <th>Price</th>
                <th>Total</th>
                <th>Action</th>
            </tr>
            <?php
            if (!empty($_SESSION["shopping_cart"])) {
                $total = 0;
                foreach ($_SESSION["shopping_cart"] as $key => $values) {
                    ?>
                    <tr>
                        <td><?php echo $values["item_name"]; ?></td>
                        <td><?php echo $values["item_quantity"]; ?></td>
                        <td><?php echo $values["item_price"]; ?></td>
                        <td><?php echo number_format($values["item_quantity"] * $values["item_price"], 2); ?></td>
                        <td><a href="index.php?action=delete&id=<?php echo $values["item_id"]; ?>"><span class="btn btn-danger">Remove</span></a></td>
                    </tr>
                    <?php
                    $total = $total + ($values["item_quantity"] * $values["item_price"]);
                }
                ?>
                <tr>
                    <td colspan="3" align="right"> Total</td>
                    <td align="right">$ <?php echo number_format($total, 2); ?></td>
                </tr>
                <?php
            }
            ?>
        </table>
    </div>
</div>
<?php

//Adding an Item to Cart
if (isset($_POST['add_to_cart'])) {
    if (isset($_SESSION['shopping_cart'])) {
        $item_array_id = array_column($_SESSION['shopping_cart'], 'item_id');
        if (!in_array($_GET['id'], $item_array_id)) {
            $count = count($_SESSION['shopping_cart']);
            $item_array = array(
                'item_id' => $_GET['id'],
                'item_name' => $_POST['hidden_name'],
                'item_price' => $_POST['hidden_price'],
                'item_quantity' => $_POST['quantity']
            );
            $_SESSION["shopping_cart"][$count] = $item_array;
        } else {
            echo '<script>alert("Item Already Added")</script>';
            echo '<script>window.location="index.php"</script>';
        }
    } else {
        $item_array = array(
            'item_id' => $_GET['id'],
            'item_name' => $_POST['hidden_name'],
            'item_price' => $_POST['hidden_price'],
            'item_quantity' => $_POST['quantity']
        );
        $_SESSION['shopping_cart'][0] = $item_array;
    }
}
Step 3: Removing a product from cart
To remove a product from cart, php “get” method is used. Using Get method, you’ll get the product id and then you can unset that product id from array of the shopping cart session. Once it is removed, product cart is updated and return the updated information.
//Delete an Item from cart
if (isset($_GET["action"])) {
    if ($_GET["action"] == "delete") {
        foreach ($_SESSION["shopping_cart"] as $key => $values) {
            if ($values["item_id"] == $_GET["id"]) {
                unset($_SESSION["shopping_cart"][$key]);
                echo '<script>alert("Item Removed!")</script>';
                echo '<script>window.location="index.php"></script>';
            }
        }
    }
}
Step 4: Shopping Cart Output
Below is the screenshot attached. Shopping cart will look like this. You can modify the look and functionality as per your own requirement.